Yesterday I showed you the drawing I came up with to figure out how to make a teapot. This is how I put it together. There's the body of the pot, given a rounded shape by sewing triangles on to the corners of a square-ish shape. I also have the lid and handle ready.
 When playing with angles, it can still surprise me how much is lost when it's sewn together. That lid looked gargantuan when it was hovering over the pot, but is barely bigger once it's attached.
 The spout has been sewn on, as well as the knob on top of the lid. Now the handle is ready to be attached.
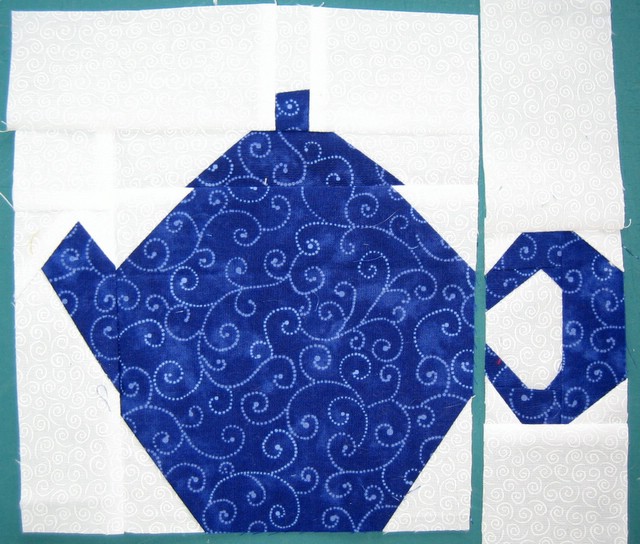 Here's the final teapot (again):
 I realized after I downloaded the photos that I'd skipped a whole lot of the steps. For the less experienced piecers, here is a more complete tutorial. This time the spout is going to be on the right side and the handle on the left.
I started with a big square. I decided to use the oversized triangle method.
 This is what it looked like after the triangles were sewn on. I sliced off the little red background triangles (which came in handy for making the handle).
 This is the rectangular background fabric for the handle. One important tip when you are working this way is to always remove the extra bit of background and fold back the triangle you've just sewn on. That way you can attach the next triangle properly:
 With all the corner triangles sewn on, extra background removed, the unit ironed and the edges all tidied up.
 The next step is to add the U-shaped bits of the handle.
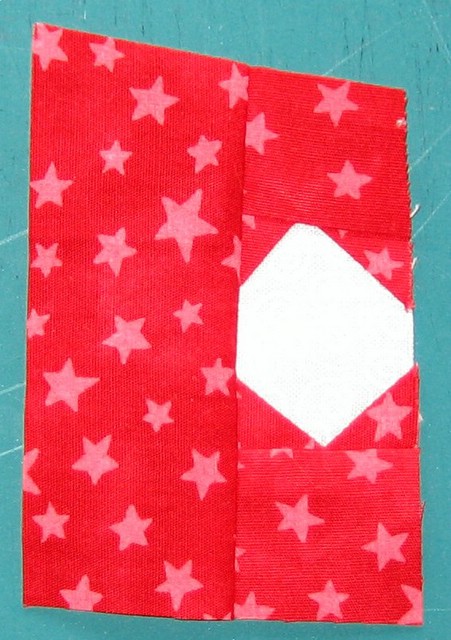 And some background triangles added to make it curve nicely.
 The handle and the body of the pot are complete.
 I've sewn my lid.
 It seemed oversized to me, so I wanted to check what it would actually look like when sewn on. I put the pieces right sides together and pinned in place along the quarter inch mark. This is not accurate, but it will give you an idea.
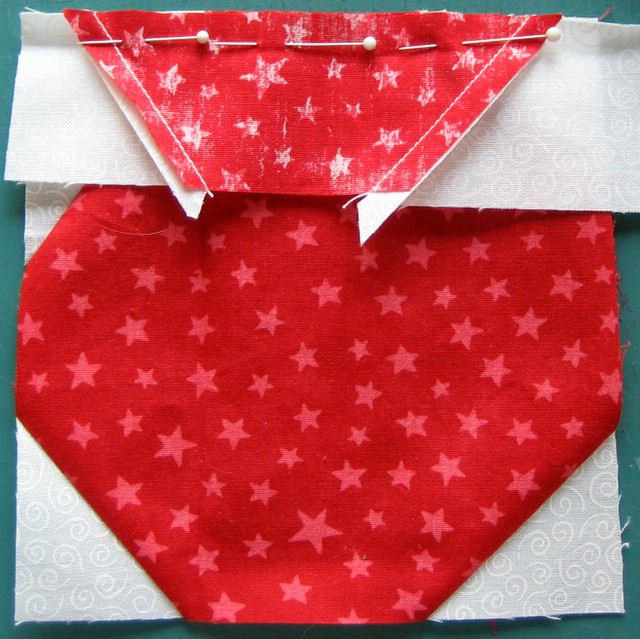 And folded back, I decided yeah, I didn't want the lid this big.
 So I cut the lid down at a jaunty angle and attached it to the pot. Think I'd have liked it better if I'd gotten it centered better, but oh well. Also sewed the knob on top. You'll notice for this second teapot that I'm not following the exact same construction order as I did on the blue pot. So long as it goes together, that's all that counts.
 And here's the handle sewn into a background strip the same width to make it easier to attach.
 To make the spout, I cut out a rectangle of the teapot fabric and layered it on top of a same-width strip of background fabric (both facing right sides up). I cut the slant for the bottom bit of the spout.
 And then had the perfectly matching angle to sew these bits together.
 After I had that on, I made a couple of slices to get the red fabric spout-shaped.
 Sewed on the bit of background fabric at the end of the spout.
 After I got that on, I straightened up the edge and added background fabric along the top. For whatever reason, I thought that spout was going to be too big and I wanted it at more of an angle, so I sliced into it some on the left size. As it turns out, I misjudged how much I was going to lose in the seam and so now the spout looks undersized.
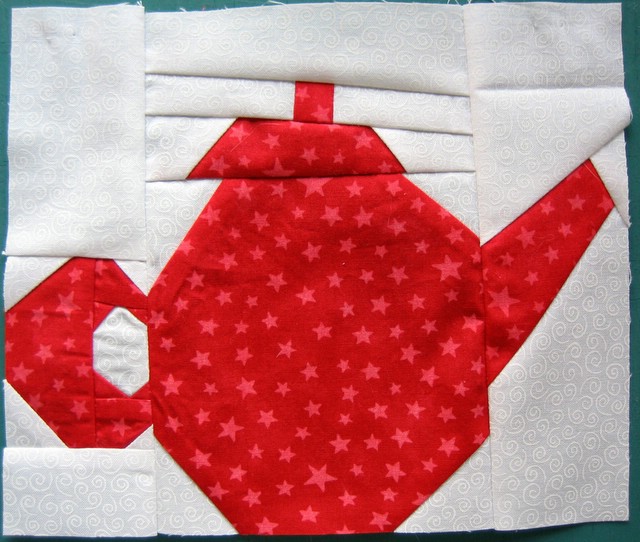
This one looks a bit whackier than the first one. Have to admit I may do a classic Do-as-I-say-not-as-I-do manuever and change the spout. I know I am always saying to people that I love all their blocks and they should just let them be and not remake them even when they see the imperfections. Why is it so much easier to accept others' wobblier efforts than it is to accept your own?
17 comments:
love the lid on the red teapot. As usual your instructions are clear and consise. Thanks!
Tonya, Your tutorials are just great. Thank you so much. You do need to make that book. Keep up the good work. I don't buy to many books but yours would be one that I did. Publish it yourself and sell it over the internet if you have to. Happy 4th over there in Egypt.
Great directions. I'd have to agree that the spout needs to be down towards the bottom of the pot curve to look like it's a seamless part of the pot. Does that make sense.
I think we are all super critical of our own work. We have much more time to sit a look at it and think!
Tonya - having read this and the last post I've come to the conclusionthat your success is down to the fact that you don't look at things as they are - more you look at them as just another shape to re-present in fabric - love the teapots - I haven't even got the Liverpool names done (5.5 done, 8.5 to go) and you're dragging me off on a tea drinking quilt idea tangent :o)
I like the spout - looks jaunty.
I think the teapot looks fine, and I sure agree with you about being super-critical of our own work. I love wonkiness in others' work, but I'm struggling right now with a piece of mine that I intended to be kind of crooked. Is it too crooked? Not enough? I guess we all need to relax. If possible.
Pretty cool, Tonya!
Are you going to make some tall, skinny teapots to go with your short teapots? A frosty pitcher of sweetened iced tea with glittery ice cubes for us southern tea drinkers?
Okay, we'll try that again. One important word was mistyped!
You do the nicest tutorials. Thousands of quilters would be lost if your site disappeared. =)
Sorry you have to move. It's a pain. But it gets better afterward, as you know. If you can't whine in your own blog, where can you?
I love your teapots and the directions are just great! Thank you for sharing.
Kimberly
VERY cute!!! I love teapots and will have to make at least one of these blocks :-) Fantastic directions - thank you.
THe teapots look great. I agree that sometimes it's good to re-do parts if only to see how it would look done a different way. The tutorial is very clear in that I can see how it is possible to make almost anything using this method. As long as you can break it into parts, the sky's the limit!
Tonya , You are so talented!!
I really want to make a day a real tonya quilt !!
You are kidding, aren't you?? I think the red teapot is better than the blue one, honestly! If you still don't like it, send it my way, I'd love to put it in one of my quilts. Thanks for all the step-by-step instruction, you're very good at expressing the details. Love your quilts and how you've evolved over the years. I remember when you were working on the miniature pink hearts quilt in the 90's....you stressed so much about it, but again, I still really love it, don't be too critical of your work, chalk it up to experience and move on. At least that's what I do and it's worked for me.
Just amazing Tonya, I love both teapots. I am determined to make myself a tea-set now!
*hugs*
Tazzie
:-)
"Why is it so much easier to accept others' wobblier efforts than it is to accept your own? "
For one, I don't think we see the extent of wobbliness in other's work. We see our own work up close and memorize every error, every make-do, every ripped stitch.
Second, we have an image in our mind of the quilt we started out to make. The actual product doesn't live up to the imagined perfection. When we look at other's quilts, we don't necessarily have that standard to compare it to, unless it was a quilt kit.
I guess if your teacups were from, say, a Jenny Beyer design, we'd all be looking at it sideways and clucking over how far "off" your blocks are. But the design is uniquely yours, and the result is wonderful.
Happy 4th!
Tonya I love your whacky teapots! The instructions are easy to follow. Especially for a newbie like me.
I think I prefer the red one! Just as it is. Don't you dare change it!!
:)
Post a Comment