These methods will get you started with improvisational sewing, but I’m sure as you work you will discover new ways to do things..
The most basic rules are these:
If it’s too long, cut it off
If it’s too short, add to it
Scissors work great, but I prefer the rotary cutter when slicing angles or large shapes (for instance, when I’m working with roof and sky pieces).
During the early phases of construction, there is no proper size. Nothing has to be just right, therefore, choose how you want it to look. Add or subtract, it doesn’t matter, but keep in mind that you will be losing ¼” in the seam allowance all the way around.
A consistent ¼” seam allowance isn’t necessary. Sew in a straight line and have enough fabric in the allowance that your seam isn’t going to shred apart.
Strip Insertion
 I sliced across the original turquoise square --not going into either corner of the square--and then placed the strip in the gap. You want to sew to the square part that the top of the strip dips down to meet (in this picture, the one on the left).
 Imagine your quarter inch seam and place the fabrics right sides together so that the strip rises up a bit and the two fabrics will meet at the quarter inch mark.

 Now when you insert a strip into a corner, you'll probably end up with extra bits of strip to slice off. Always follow the line of the base fabric and you'll be fine.
 And you don't have to insert a single strip of fabric. You can make a strip by joining two different strips together and then insert them in the usual way:
 Now don't ask me why, but when I did the next graphic, I changed the angle of the slice. With these next illustrations, I wanted to show that when you slice from corner to corner, you will get a different shape depending on where you sew the second triangle back on. You'll either get a square:

 Or a rectangle:


 Lay your initial square/rectangle down on another piece of fabric (or wide strips work). The right sides should BOTH be facing up. There should be at least a quarter inch extra for seam allowance. (After not getting it quite right many times, I suggest you throw in more extra than that. This illustration looks skimpy to me)

Here's how you would angle the longer triangle on and sew.

 Overlap the fabric, BOTH sides right-side up, and slice.

Join them together, offset as always.
 This is probably familiar to anyone who's used angled joins for their binding. (I did that once and then never again. Too much work - which is kind of a hoot when I think back on it now.)
Well this is the same process you use to make the angles on flat roofs for example. To get this:
 You would just do another slice and join.

 Then you'll need to make your second slice through that first seam.
 And yes, you can start with a triangle to add a triangle. I often call that inserting a triangle, for obvious reasons.
The most basic rules are these:
If it’s too long, cut it off
If it’s too short, add to it
Scissors work great, but I prefer the rotary cutter when slicing angles or large shapes (for instance, when I’m working with roof and sky pieces).
During the early phases of construction, there is no proper size. Nothing has to be just right, therefore, choose how you want it to look. Add or subtract, it doesn’t matter, but keep in mind that you will be losing ¼” in the seam allowance all the way around.
A consistent ¼” seam allowance isn’t necessary. Sew in a straight line and have enough fabric in the allowance that your seam isn’t going to shred apart.
Strip Insertion
Inserting a strip means slicing a cut through a piece of fabric and sewing a strip of fabric into that gap. For example, in this block, a strip of dark blue fabric has been inserted into a turquoise square: I began by slicing the square down the middle:
 Then I flopped one of the newly-made rectangles over on top of the strip and sewed it lengthwise:
I pressed flat and trimmed the unit up, following the edge of the original block. In other words, I sliced the tail off:
 I then sewed the other turquoise rectangle on and had the block I showed you up above.
Inserting at an angle is slightly trickier. This is the final block with an angled insertion:
 I then sewed the other turquoise rectangle on and had the block I showed you up above.
Inserting at an angle is slightly trickier. This is the final block with an angled insertion:
 I sliced across the original turquoise square --not going into either corner of the square--and then placed the strip in the gap. You want to sew to the square part that the top of the strip dips down to meet (in this picture, the one on the left).
 Imagine your quarter inch seam and place the fabrics right sides together so that the strip rises up a bit and the two fabrics will meet at the quarter inch mark.
Press the unit flat and THEN trim the strip even, following the lines of the original piece: Now add the other side of the square, again getting that little bump up at the quarter inch mark:
Now when you insert a strip into a corner, you'll probably end up with extra bits of strip to slice off. Always follow the line of the base fabric and you'll be fine.You can also insert a strip into a strip. Works the exact same way:
And you don't have to insert a single strip of fabric. You can make a strip by joining two different strips together and then insert them in the usual way: Now don't ask me why, but when I did the next graphic, I changed the angle of the slice. With these next illustrations, I wanted to show that when you slice from corner to corner, you will get a different shape depending on where you sew the second triangle back on. You'll either get a square:Or a rectangle:As always, if you've got extra bits of fabric, just slice them off.
Sometimes you want the strip insertion to be a little more complicated. For instance, this is how I used to use for make the letter y. First I visualized it (sometimes it helps to draw sketches or mark the fabric), and then I sliced, starting with the first long cut. I set that side apart and then made the second slice. I inserted a strip into the shorter gap first, making sure to trim it up even, and then I inserted a strip of letter fabric into that long gap. Trimmed it up and added that other triangle back on:


Sometimes you want the strip insertion to be a little more complicated. For instance, this is how I used to use for make the letter y. First I visualized it (sometimes it helps to draw sketches or mark the fabric), and then I sliced, starting with the first long cut. I set that side apart and then made the second slice.
I inserted a strip into the shorter gap first, making sure to trim it up even, and then I inserted a strip of letter fabric into that long gap. Trimmed it up and added that other triangle back on:Corner Triangles
Another very helpful technique is adding triangles to the corner of blocks. That's the way to make rounded edges, such as on the letter O. I don't have a picture of the final product (d'oh) but this is what it looks like when you add a triangle. You can put the triangle on at a jaunty angle, but make sure you have extra fabric. You need at least a quarter inch of triangle ears sticking out. You can pin the pieces together, then fold the triangle back to get an idea if it fits.
Sew along the edge of the triangle like this: 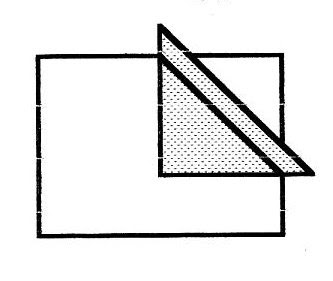 Then trim off the excess by following the lines of the original square:
 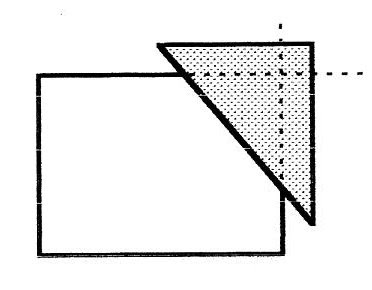 You can make a circle by adding small triangles to each corner. I've added strips all the way around so you can see the final effect:

I used too big of triangles (and ended up with more of a square in a square) so I cut my block down smaller to make it work. Remember, if it's too big, just cut it down...
Then trim off the excess by following the lines of the original square: You can make a circle by adding small triangles to each corner. I've added strips all the way around so you can see the final effect:I used too big of triangles (and ended up with more of a square in a square) so I cut my block down smaller to make it work. Remember, if it's too big, just cut it down...
When you want to add a longer triangle (hey, I can't remember the names of these things) like this, another method comes in handy.
Lay your initial square/rectangle down on another piece of fabric (or wide strips work). The right sides should BOTH be facing up. There should be at least a quarter inch extra for seam allowance. (After not getting it quite right many times, I suggest you throw in more extra than that. This illustration looks skimpy to me)In this picture I didn't cut away the area where I wanted the new triangle (as visualized above) - I just sliced through both pieces.

So that you get a triangle to sew on. (and again, this was a wee bit skimpy)
Here's how you would angle the longer triangle on and sew.
You can cut away the extra fabric from the base fabric (make sure you leave enough for the seam allowance.
Angles
Say you want to match an angled fabric up so that you get this result:
Say you want to match an angled fabric up so that you get this result:
Overlap the fabric, BOTH sides right-side up, and slice.Join them together, offset as always.
This is probably familiar to anyone who's used angled joins for their binding. (I did that once and then never again. Too much work - which is kind of a hoot when I think back on it now.)Well this is the same process you use to make the angles on flat roofs for example. To get this:
You would just do another slice and join.Now one of those fabrics can already be angled. In that case lay it down just as I have above and follow that angle when cutting into the second piece of fabric.
If you need the end result to be a triangle:
Then you'll need to make your second slice through that first seam.And yes, you can start with a triangle to add a triangle. I often call that inserting a triangle, for obvious reasons.If matching angles of slices and such just annoys you, don't forget the old tried and true classic of just sewing on a strip (or square) and then whacking off all the extra. You'll have bias edges, so handle the block carefully. I worked this way for years without having a problem.
To sum up: if it's too long, cut it off and if it's too short, add to it. Have fun.
10 comments:
It all looks perfectly clear to me. I like the drawings as well as the photos. The main problem I usually have is not allowing for the seam, especially on a narrow insert. It always looks way too wide with the seam allowance.
this is great Tonya. I've sent an email directly with my suggestions for what they're worth ;-)
I just glanced quickly at it, and it looks good. I will be looking more closely this weekend :-)
wow, this is great, it must have been a lot of work....
Great tutorial!
Directions?!? Who reads directions?!?
This post is going to live in my del.icio.us. Thanks!
Thanks for all of your efforts - the rest of us SO appreciate the time and care you put into sharing your techniques!! Can't wait to take my printed out copy and sit down with a mug of hot tea and some scrappy fabrics at my sewing machine...
Wonderful class, Tonya! Thanks!
Thanks for the tutorial. I can totally understand and follow what you are talking about with my Dutch brains!
Post a Comment