I was reading through Bonnie's guestbook on her Quiltville blog, and came across a request for instructions on free-piecing letters. Hey, I'm thrilled to be asked, your wish is my command.
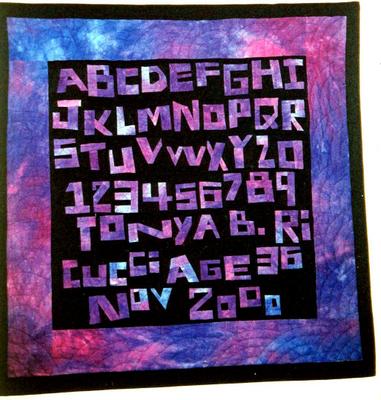
But first, here’s my Alphabet Sampler quilt. It’s 36” x 38”.
I think I’ve previously mentioned that I discovered I could free-piece letters while working on Halloween Houses (which you don’t get to see until the appropriate holiday season). I loved the letters and wanted to play some more. Initially I planned to do something like a traditional alphabet quilt with each letter of the alphabet making up an individual block and sashing in-between.
Then it struck me that I could make a quilt which looked like a cross-stitch sampler. Long ago, I tried to cross-stitch one of those for myself. I stitched the letter A in royal purple, or at least stitched most of it. Then I got bored, hated the counting, and tossed the whole thing aside. So here was another chance to make myself a sampler.
I had a gorgeous 2-yard piece of hand-dyed fabric which I had never worked up the nerve to cut into. I decided the fabric – which wasn’t just purple but also pink and blue – would be stunning set against black and that the variations in the fabric would help give each character its own look, while allowing me to only cut about three strips to get started. The hand-dye also had the advantage, as did the solid black, of being completely reversible.
I started at A and worked my way through the alphabet, working on about three letters at a time. (In a classic do-as-I-say-not-as-I-do fashion, I recommend strongly that you don’t follow my example and instead work on the easiest letters first if you’re trying this technique out.) I used every letter and number I created even when I wasn’t thrilled with it (the W in particular comes to mind). As I went along, I freely made the letters and numbers without worrying about what size they were and without adding any of the background fabric around them.
Having said that, I only had a height variance in the units of about 2”. I expect that if I had made characters with just the skinniest strips and then made others with just the widest, I would have had more of a discrepancy. As it was, didn’t have a problem.
After all the units (the letters and the numbers) were together I started fiddling with them to figure out how many could go on a line. I put the zero at the end of the alphabet and split up my last name, an effect I quite like, and which you may have noticed in my recently pieced bed quilt.
For each line, I figured out what was the best height for the characters to be. Now knowing what a pain in the patootie that is, I make all the characters in a quilt the same finished height. It just saves on aggravation, but probably lessens the character of the quilt. It’s a sacrifice this lazy gal is willing to make.
Some letters had to be cut down; others needed background added to make them taller. After that step, I added a narrow strip to the right of every unit (except the last on the line) – otherwise they’d all be jammed up against one another. Then joined all the characters on each line, and sewed a narrow strip between the lines. Not that you need to know all the gory details, so I'll stop babbling now.
So that's my quilt. In the near future I will begin writing out the instructions for how to piece liberated letters so that anyone who is interested can try them out. I would love to get feedback so that I know people are actually following along. Hey start a blog and let me know where it is and I'll keep track of your progress that way. Or you can leave comments here in my blog. Anybody interested?
Thank you. Thank you. I love seeing your work. I check your blog everyday to see if there is something new posted. I am definitely following along!!
ReplyDeleteWow, instant feedback. Thank you, and thanks for the kind words. I look forward to corresponding with you and if the first "lesson" isn't posted in here today you can direct nasty thoughts my way.
ReplyDelete