I find it a bit humerous that I'm getting compliments on how well the colors of my orphan blocks are going together.
I've always been very picky/fussy/paranoid/selective about MY quilting colors. Intense blues, pinks, purples, turquoises, all those analogous colors on the color wheel. Very slowly I've been letting some greens in - true or bluish greens, none of that yellowy stuff. Very recently I've decided that red can sometimes play well with my colors, but again it has to be true red or bluish, nothing orangey.
There will be no metallic at any time (tho a few did slip in when I first started buying - they've since been weeded), esp not that heinous gold. No "neutral" colors, no browns, tans, taupes, bone, ecru or anything vaguely in that region. I completely disagree with those who say that neutrals don't change the color scheme. Yes, they do.
Unless I'm buying for a specific project there will be NO white in my fabrics. I've been known to take a blue or purple permanent marker and get rid of any white highlights.
Sometimes I get reactions like, your quilts need some orange or yellow or complementary color.... Not for me.
So when people say "hey those blocks go together" there is a very good reason. This is a true ME quilt.
Now since 2000, when I began playing with Halloween quilts, yes, I've bought some orange and lime green. And yes, I've now got yellows and some very bright fabrics. But those fabrics only play in my not-my-colors quilts. I made a really fun string star with yellows, oranges, and limes on a red background. Okay, I enjoyed it, but it's not me. And yes, there are some wonky houses started in pinks and bright greens, but those are for happy, spring quilts. Not my quilts, altho they'll go on my walls for a very limited amount of time each year.
So, okay, I'm "growing" and not as limited as I used to be. I spend more money on fabric now, so being limited had its advantages.
On a completely different note, I've finished quilting on my Halloween Faces quilt. Just the binding (boo) left to do. I pin basted the Noel sampler this morning and started quilting it. I first tried quilting around the letters, in the ditch, in white quilting thread, but didn't like how it looked. Took that out and am now circling the border in my favorite fan pattern. What can I say, it makes any quilt look great and it's a very comforting pattern to me for some reason.
Wednesday, August 31, 2005
Kate Hepburn
| Katharine Hepburn You scored 16% grit, 23% wit, 47% flair, and 26% class! |
| You are the fabulously quirky and independent woman of character. You go your own way, follow your own drummer, take your own lead. You stand head and shoulders next to your partner, but you are perfectly willing and able to stand alone. Others might be more classically beautiful or conventionally woman-like, but you possess a more fundamental common sense and off-kilter charm, making interesting men fall at your feet. You can pick them up or leave them there as you see fit. You share the screen with the likes of Spencer Tracy and Cary Grant, thinking men who like strong women. you can find the test at: http://www.okcupid.com/tests/take?testid=4621123663119520922 |
Tuesday, August 30, 2005
destruction and progress
Today I ripped apart a quilt top, and boy did it feel good. Didn't even take a photo of it, just let the seam ripper loose.
Back in 2002, I had a leftover block from a quilt I really loved. That quilt was fabulous, came out great. This little guy, my name, just hadn't made the cut. It's about 7" x 17".
Back in 2002, I had a leftover block from a quilt I really loved. That quilt was fabulous, came out great. This little guy, my name, just hadn't made the cut. It's about 7" x 17".
 I had played with just the two fabrics, a black with greyish speckles and a gorgeous hand-dyed purple that is one of my favorite fabrics. Well, I cut and sewed and cut and sewed and thought that the top looked really cool. But didn't feel like quilting it. And still didn't feel like it. Individually, I loved the components. Together, they looked like a gigantic bruise. An egotistical bruise at that.
So today, I disassembled that top into parts, some of which I incorporated into the orphans quilt. They're the three different chunks of purple and black rectangles. I love the zing they add to this top, tho I do worry that maybe I still have too large of a chunk in the middle there and I gotta go turn that upside down so I don't always see that inadvertent E staring at me. Looks like there is a secret message in there, and there isn't.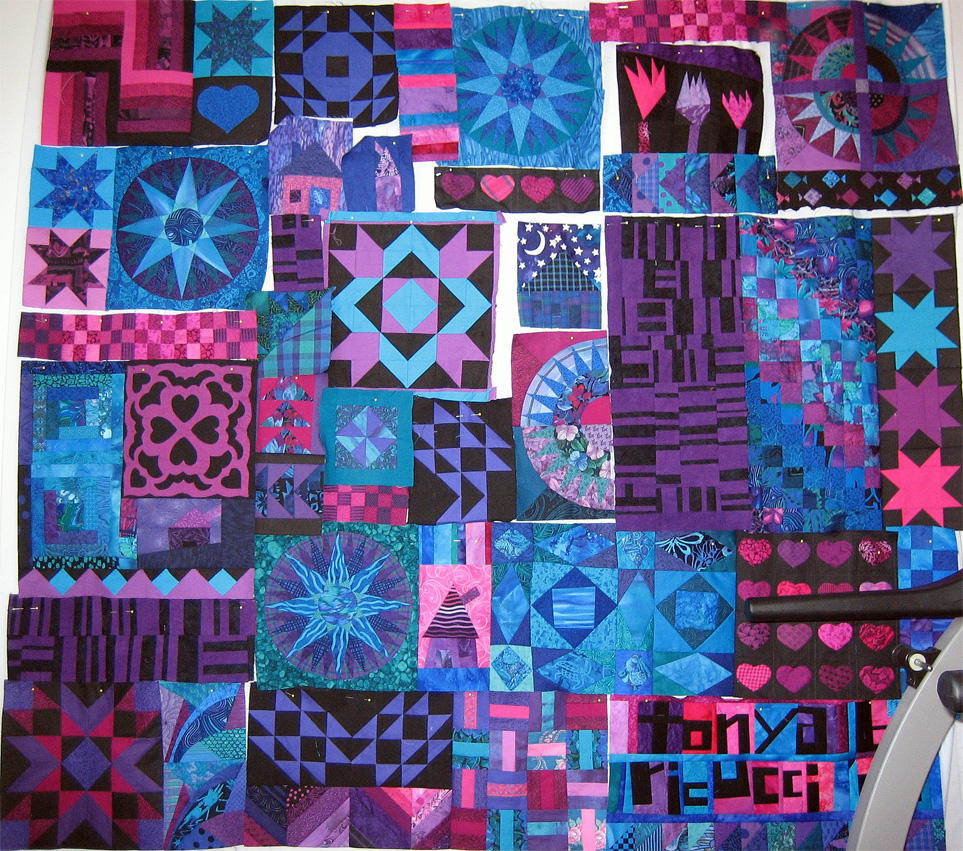
I've sewn that bottom row together now, and the row above it, tho the nine-patches at the end are still on trial. I whacked off the bottom row of pink hearts to make that block fit in with the rest of them. That row may get sewn in on the top row, beneath the mariner's compass.
Monday, August 29, 2005
bad kitty, good kitty
My cats were doing their best to be obnoxious this morning. Howler started wailing at 5:15am. I mean crying and crying and leaping on the bed, jumping down, back on the bed. My sweetie likes to think that Howler is just lonely and affectionate. Ha! Much more likely there wasn't enough food in the food dish. Even after a year and a half of living indoors with a constant supply of food, he can't get over his street cat starvation complex. Then he ate too fast and managed to yack twice today. That'll teach me to not make sure the cat food is heaped high when I go to bed.
So after Howler has woken me up, I get a visit from Lily doing her best to dig her way to China through the bedsheets, and then Pokey starts crying for attention after dropping her toy Mousey on the bed. Sigh.
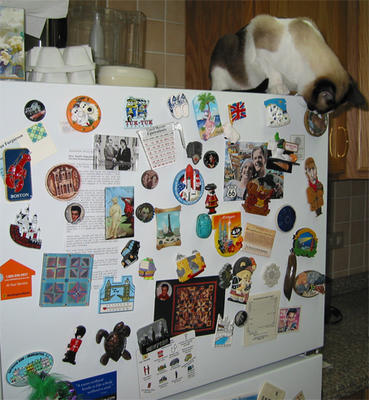
This is a photo of bad Pokey on the fridgetop playing with my tacky magnet collection.
 And after they just make me nuts, then they do something so sweet like curl up on my chest and purr and purr. And here is Lily actually being a bad kitty by sleeping in the bowl with all my fabric scraps but she does look so sweet.
So after Howler has woken me up, I get a visit from Lily doing her best to dig her way to China through the bedsheets, and then Pokey starts crying for attention after dropping her toy Mousey on the bed. Sigh.
This is a photo of bad Pokey on the fridgetop playing with my tacky magnet collection.
 And after they just make me nuts, then they do something so sweet like curl up on my chest and purr and purr. And here is Lily actually being a bad kitty by sleeping in the bowl with all my fabric scraps but she does look so sweet.
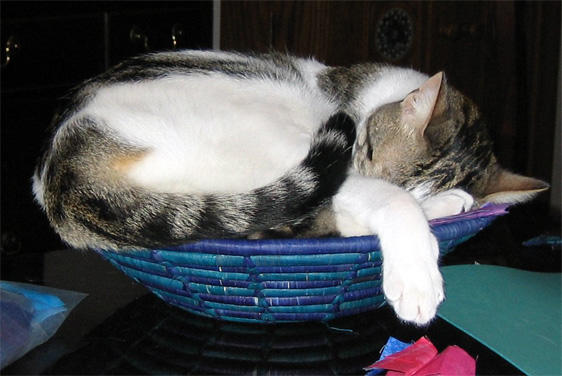 I've been doing some of Bonnies "Leaders and Enders" while sewing on the orphans. Of course my quilt won't look anything like Bonnie's since I'm using itty bitty teeny tiny scraps and just doing a crazy. A scrap has to be smaller than 3/4" square for me to throw it out - unless I hate the fabric in which case it goes into the "donate" bag.
Sunday, August 28, 2005
orphan progress
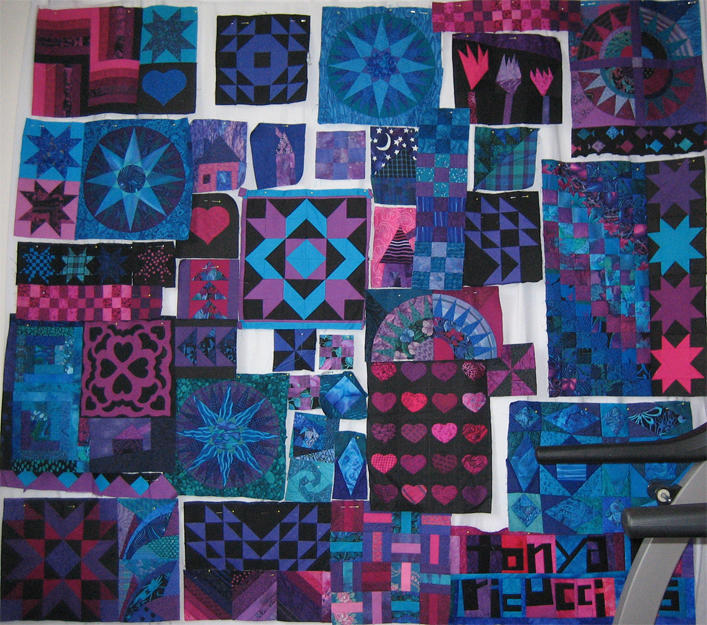 Made some more changes to the orphan quilt. I pulled out all the leftover letters from my bed quilt and was able to write out my name as well as on 05 (originally made as an Oh S) without having to create anything from scratch except an apostrophe. I had a lot of extra letters. Name is a bit larger than I would have made it from scratch, but oh well. So far I have not created anything for this project.
I've joined pieces together on the left side - figure that column will be about 18" wide. Next might be that bottom row.
Thursday, August 25, 2005
Learning Hand Piecing

Back in '88 after I'd moved away from home, I took a class on hand piecing. Now remember that I was madly in love with quilts at this point, and had worked on a couple of bed-sized ones with my Mom, but so far had not enjoyed the whole sewing experience. Rotary cutters, going fast, matching seams - very stressful. So a hand piecing class seemed like an excellent way to learn the calm, hopefully happy, way to make quilts.
Loved it from the very beginning. Took a class at a local high school thru an adult education program. We had an instructor who fit my learning-style to a T. She showed us her wonderful quilts, she showed us a wide range of blocks to choose from and in no way tried to make us do a certain quilt. All we were working on was one block and we could do it in whatever colors or fabrics we wanted and we could make any changes we wanted. She just showed us HOW to construct the block. These are templates, this is how you figure out what templates you need, this is how you mark and cut your fabric, this is the stitch you use...
The woman sitting next to me was always confused. She wanted to be told exactly what to do for every single step.
For me, it all made sense, it all gelled. Sure, there were boring parts (tracing around templates and cutting each individual piece, snooze), but they weren't stressful. It wasn't hurry, hurry, hurry. And I was working on my project, not something pre-chosen. Knowing me, I'd have dropped the class if we were forced to work on a project I didn't like.
And you're going to laugh at me now, because I usually don't have these flights of fancy and I don't believe in reincarnation, but it seemed like I'd done this before, that these were familiar actions, that I was drawn to quilts because they had been so important to me in a previous life or something. Not that I'd have made a good pioneer or Amish woman - no plumbing, electricity, heating, air conditioning, you want me to do what with that chicken? I don't think so.
Back to reality now, I chose my block and three colors to work it in. Have no idea what the name of this block is, but I think I made changes to it - made it more complicated. Looking at it now I think, why did I do all those triangles - I could have done this with a lot fewer seams.
After I completed the block, I planned out a whole medallion-style wallhanging. I started sewing on tiny borders and worked on a more elaborate pieced border (that's over on the left side towards the bottom of the orphan quilt layout).
I had meanwhile been piecing other blocks on the sewing machine and had grown more confident in my ability to use it. So it struck me, why am I spending all this time hand-piecing straight lines? I hate it and it would be much faster to use the machine. Tried that and could really tell the difference between the hand pieced and machine-sewn borders. Ripped out the machine ones and was then too bored with the project to ever pick it up again... Sometimes I lose the momentum on a project and that's all she wrote.
current project and other stuff
 I've sewn a bit on the orphan quilt and moved blocks around. Trying to get black balanced out and not too many pointy bits together, not too many straight lines together. Sewed my nine patches into rows to make it easier to see how they were going to work. Think I need some pink in the lower right corner.
I'm not working on this quilt very fast. I don't want to go too fast (what, me impulsive?) and start chopping blocks up and then realizing it doesn't work. That and I walked to my friend's apartment for quilting yesterday and now my knee hurts a bit more. I was fed up with being invalidy and now look at what I've done. It's no big deal, just need ice packs again. This aspirin stuff does not seem to be such a miracle to me.
Watched one of my favorite gross-out movies, John Carpenter's "The Thing." Yes, it overdoes the gore, but I love the tension that builds up, the isolation and paranoia. One of my favorite X-Files episodes, "Ice," owes a lot to this movie.
A friend loaned me the first season of "The Shield." Wow. I love a show with moral ambiguity, with reprehensible characters committing illegal, immoral acts who still manage to gain your sympathy before the end of the season. I would recommend it to anyone who loves "The Sopranos" so long as they don't mind if it's the cops who are the bad guys, not just bad guys who are bad.
Rockstar:INXS update. Last week it wasn't a surprise that Jessica went bye-bye. She seemed to be just phoning in her INXS song. I like Deanna's raspy voice, but not how she sings. If you could just combine her with Jordis, they'd make an awesome combination. I want Deanna to go this week. She just so obviously doesn't have it for the long haul. And her song sucked, as did MiG's tho they both sounded good. I'm worrying about Marty tho now. He does seem too punk for the band and they definitely let him know it.
Wednesday, August 24, 2005
Riding the Orphan Train
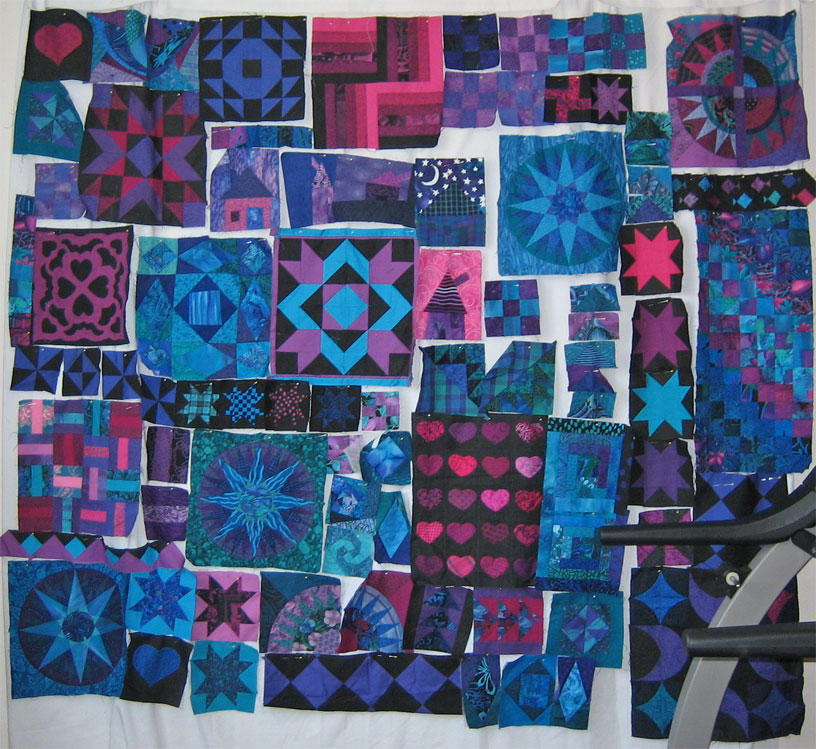
I've been commenting with Finn (Pieces from my Scrapbag) about her gorgeous Orphan Train quilt. It's a style of quilt I've long loved because they usually are less static than planned sampler quilts where everything ends up in a same sized square. With orphans, it's much more of a puzzle trying to get the pieces to all fit together.
So rather than doing the Halloween quilt I was mulling over (I know, it's only August - it can wait) decided, why not get out all my bits and pieces and see how they go together. Not all of these are true orphans. They were never made for a specific quilt, but for this very thing. I was teaching myself how to quilt using "Quilts, Quilts, Quilts" and I went through picking blocks and techniques I wanted to try.
 Not the best photo to see if it's working, what with the treadmill in the way, but it's all I got.
This is my initial layout, and I know I'm going to have to change it. The wonky storm at sea block right next to the tulip block is too same-same. That very contrasty black and pink Fence Rail may need to be moved from the top row, but not sure where to.
This is before I've sewn anything together. I did take a few blocks to the machine - the ones that are going together no matter what. This is going to be slow going, and I need to start organizing it so that I don't end up with Y-seams, the bane of my sewing existence.
Before I get much further, need to get my liberated name sewn and ready to go in. I'll use some of the leftover blocks from the bed quilt.
Perle Cotton
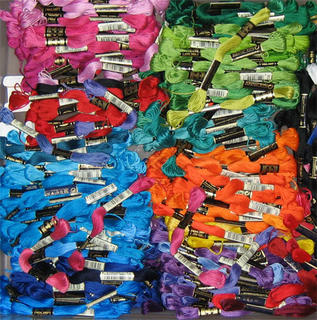
Both embroidery floss and perle cotton give you a showy stitch when you quilt with them. Embroidery floss has the advantage of easy availability and a wider variety of colors. The disadvantage is that it is 6-ply - there are six different threads wrapped together. It makes it harder to thread the needle and maybe I'm the only hopeless one here, but I seem to get loops in one of the little threads and so it pulls funny and unevenly from the others. Anyway, you can separate the plies (plys?) and 3-ply will give you the same effect as using perle cotton size 8. Use all 6-ply for a very bold stitch.
I didn't know if I was going to be able to find embroidery floss here, so I stocked up before we left the states. And then I found floss on sale for 11 cents a skein. Eleven cents. That's a steal. Had to buy even more. As it turns out, I can buy good quality DMC floss here, tho I've heard rumours that may change.
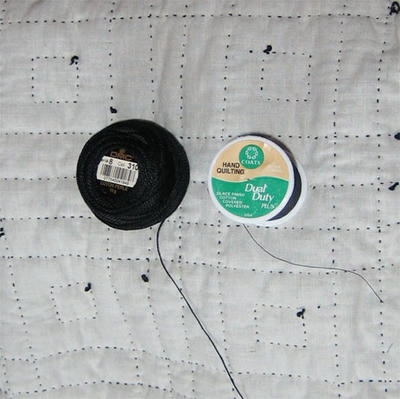
 Perle cotton size 8 comes in balls. Larger perle comes in a twisted length almost like floss. I've never tried quilting with that larger size and I'm not sure if it can be done. Anyone tried it?
Anyway, when I talk about quilting with perle cotton, it's size 8 I'm talking about. You can usually find black, white, red and blue fairly easily; other colors at specialty craft, art, or thread shops.
This is the back of one of my quilts done with the perle cotton. And my knots - makes it look interesting. You can see how much thicker the perle is than the quilting thread.
I didn't know if I was going to be able to find embroidery floss here, so I stocked up before we left the states. And then I found floss on sale for 11 cents a skein. Eleven cents. That's a steal. Had to buy even more. As it turns out, I can buy good quality DMC floss here, tho I've heard rumours that may change.
 Perle cotton size 8 comes in balls. Larger perle comes in a twisted length almost like floss. I've never tried quilting with that larger size and I'm not sure if it can be done. Anyone tried it?
Anyway, when I talk about quilting with perle cotton, it's size 8 I'm talking about. You can usually find black, white, red and blue fairly easily; other colors at specialty craft, art, or thread shops.
This is the back of one of my quilts done with the perle cotton. And my knots - makes it look interesting. You can see how much thicker the perle is than the quilting thread.

Tuesday, August 23, 2005
passionless strippy
I need to be passionate about whatever quilt I'm working on. When I'm not, it too often shows in the final result. Here's a prime example for you.
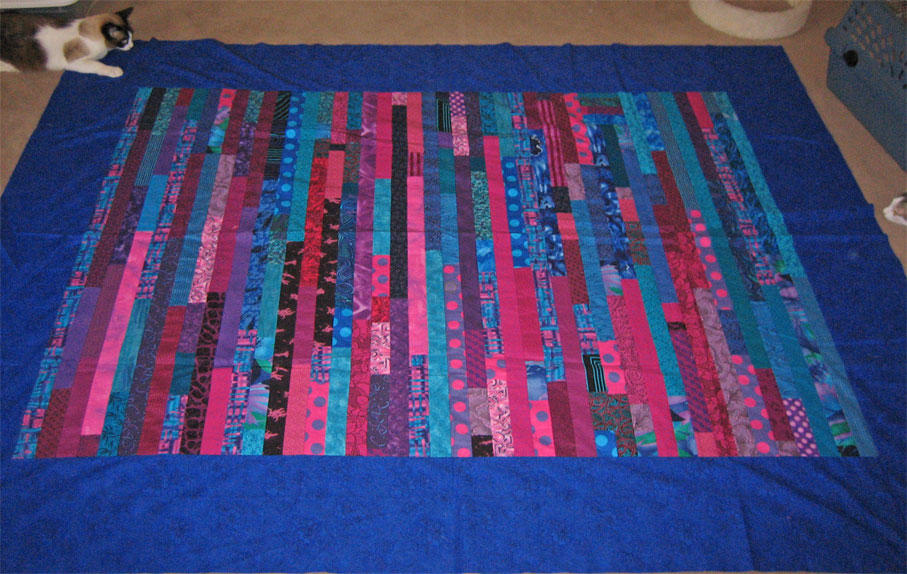
Back in 2004, I set out to make lap quilts for us since we hadn't brought any. Remember that I said I was foolish for thinking it doesn't get cold in Cairo? Well I am and it does. It can be particularly chilly inside, even with the central heat going, because the buildings are all designed to repel heat. Lots of marble and concrete walls. Great in summer, less thrilling in winter.
Anyway, for my lap quilt, I chose a style I'm quite fond of. Gwen's "Liberated String Quilts" has two examples, one modern which I love, and one antique that is okay, but still fun. More recently, Bonnie (over at Quiltville) has posted a couple of lap quilts done in this style and hers came out great.
So I decided to make a strippy using up fabric that I used to like, but now don't. Don't like the fabric - not a good beginning. I had loads of 2" strips, so I decided to use that width.
[Ooh, we've got gremlins in the plumbing. The water has been off for awhile and when it rushes back in it sounds really scary. The cats just freaked and fled the study - all bushy-tailed and low to the ground. I expected them to be in hiding, but they were very alert in the hallway - trying to decide which way to run.]
I did my best to sew them together randomly, not controlling placement of color, trying for a true scrappy effect. Okay, I admit I broke down here and there and made some deliberate choices. Wish I had made more.
Anyway, got this done and a year later I still dislike it intensely. I like it better in the photo than I do in person. I'm not saying it's a horrible quilt - just not what I want. I don't want that laying around in my living room, don't want to look down at my lap and see it. Ick. It's going to get donated to a charity project and will hopefully find a home with someone who appreciates it.
What did I learn? Follow Bonnie's advice and use fabric I hate only in very small bits. Forget about that random piecing stuff - I like my results better when I have some control.
And when I am not happy with what I'm doing I need to put it aside. I did that with my bed quilt with all the letters and when I came back to it six months later I was really pleased with it and it was a joy to work on. I have some other projects that I look at and think, why did I bother finishing that one? Obviously I didn't think it was thaaaat bad while I was working on it or I would have quit.
But is not that bad good enough? Shouldn't the mark be higher than that for a project I'm putting my time and materials into? Shouldn't I be wowed?
Not necessarily wowed throughout the project - about halfway or two-thirds done thru a big project I tend to get draggy and not so thrilled, so I have to compensate for that and try to differentiate between "this quilt is sucky" and "this quilt is taking too long and I like instant gratification."
Still it's a good question to ask yourself. Do I feel passionate about this project? Am I excited? When did I lose my passion - have I taken a wrong turn?
Okay, fine, good enough, and it'll do are not enough.
Okay, unless it's a crib quilt that is going to get thrown up on - fine is just fine for that kind of project.
Monday, August 22, 2005
Quilting
I wanted to explain how I began hand quilting and then realized that I couldn't do that without telling about how I began quilting.
Quilting had never been important in my life. My Mom had taken a course on hand piecing and quilting in the mid-1970s while she was working on her Master's Degree, so there were a few brown-fabric pillows around and she'd made a king-size bed quilt in yellows and browns that I think her mother quilted (sorry, but was it ever ugly). And Mom made a Christmas banner that says JOY that I absolutely treasure. I don't remember her working on any of these peices - in my memory they are always there. After Mom made these things, she went back to knitting sweaters. I know both my grandmothers quilted, but I don't recall ever seeing a quilt at their houses.
I'm not going to go into detail about my first quilt, which I worked on only to get a dramatic red and black and white bedspread, and which I only pieced the Roman Stripe squares of before getting bored and quitting. (Mom finished up the top, one grandmother quilted it pretty poorly with knots on the top, and the solid red I shouldn't have used bled like a bad horror movie. ) I had no further interest in quilts or quilting.
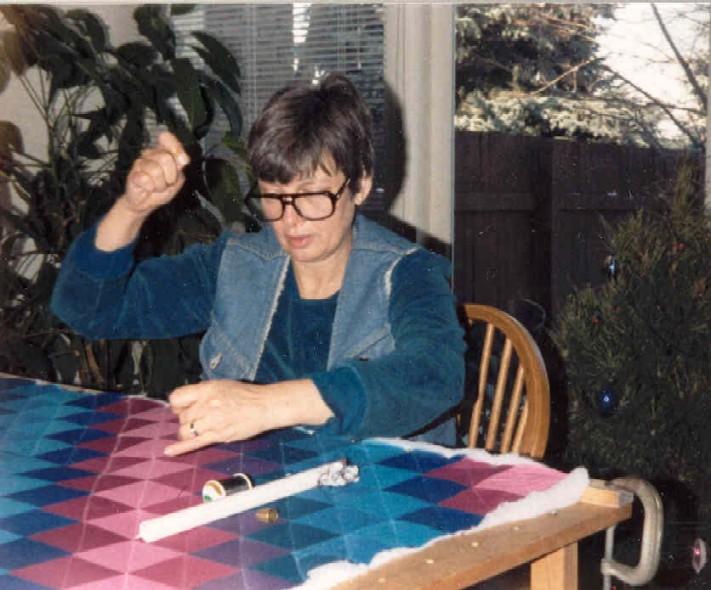
A couple of years later, in 1987, my parents and I were travelling together on the east coast and went to Lancaster County, Pennsylvania. In the People's Place Museum I had a life-altering experience seeing the Amish quilts on the walls. Stunning, brilliant, luminous in bold patterns. That was it, I was hooked on those colors and on quilts. I decided I had to have a Sunshine and Shadow double bed quilt, so Mom and I went into a local store (Zooks' Hardware or something like that) and bought poly-cotton blends in solid colors that I loved: pink, fuschia, magenta, teal, turquoise, royal blue and purple. Didn't know how much we'd need, so we winged it.
That winter I was living at home with my folks and taking my final university classes. Mom and I started working on the Sunshine and Shadow quilt using rotary-cuttered strips sewn into tubes, cut apart, shifted, and resewn. I did the cutting and the keeping track of what got sewn where; Mom's job was to sew. Looking back, it's pretty funny how concerned I was about all those seams not meeting "properly." Mom was excellent at getting things done and not worrying about the small stuff - a trait I didn't develop until years later.
It's amazing we only ran out of one fabric. Had to use a 100% cotton in a similar color to replace it. The cotton doesn't have the shine of the poly-cotton, so it's obvious where it is. Of course if I were making this quilt now, I'd have intentionally switched out fabrics to make the quilt look more interesting.
I chose a bright pink flannel to be the backing and we put the quilt top on the frame my Dad had constructed. Mom showed me the basics of the quilting stitch and that was it - we were off. We marked with slivers of soap, a bit at a time, going from corner to corner in each square and not worrying about the quilting line itself being straight. I think the squares were about 2 1/2".
This is my Mom working on the quilt.
 I actually pulled the darn knots into the quilt through the top (making holes that the batting still oozes out of) just like I was supposed to.
We were rapidly running out of time before I was due to graduate and head off into the world. We knew we couldn't get all the quilting done, so we did every other line going in one direction to stabilize it - no basting necessary. The quilting stitches from this period look terrible. Part of it was due to the rush and part due to me learning.
So eventually there I was, far from Mom, working to finish this quilt. I purchased a huge oval quilt hoop and tried to quilt with it. I hated it and gave up using it in despair. If I had to use this hoop, I was never going to get the quilt finished. It never occured to me to buy a new hoop. Anyway, tried quilting without the hoop and loved it. Eventually my stitches became smooth and even and I just left all those knots on the back of the quilt, cuz I could.
It took me five years to quilt the Sunshine and Shadow quilt, taking breaks to work on other projects. The quilt graced our bed for many years and is now living in storage. Foolish woman that I am, I thought it was going to be too hot in Cairo to need quilts. I was wrong.
So I continued making quilts using standard quilting thread and a size 10 between needle. Enjoyed it immensely. I still find nothing more calming than the act of quilting.
In the mid 1990s, my friend J made a fantastic folk art quilt that she quilted with perle cotton, the first time I'd seen that done. And she didn't use patterns, she created designs that enhanced the image - she quilted "oink" in an appliqued pig and created a sunrise behind the rooster. The big stitches, as well as her designs, made a big impact on me.
So when I was in charge of organizing a quilt for a friend I chose to use perle cotton on the very bold quilt we'd made. I echo quilted around the images in the quilt, taking 1/4" stitches. As I continued quilting, my stitches kept getting smaller and smaller as I got used to the huge needle.
When I made my first liberated houses quilt in 1996, I used embroidery floss in many different colors to quilt it. I tried to make my designs reflect what was going on in the block - I quilted bricks, chimney slates, stars, snowflakes.
Since then I've used floss and perle cotton on numerous quilts, often in the fan pattern, because I love the bold look of it. It all depends on what the quilt needs. With the bigger threads, I do leave the knots on the back of the quilt; they don't bother me any.
On a final note, my Mom died 12 years ago. I still miss her a great deal and am thankful that we had a common interest in quilting. After she worked on my quilt, Mom made many more for herself and others, in much nicer colors than the yellows and browns available in the 70s.
Sunday, August 21, 2005
Quilting Without a Hoop
It astounds me that so many people quilt with frames and hoops. I gave that all up as too constrictive within the first 3 months of learning to quilt. It was difficult to make stitches, let alone even, small stitches. I think I was resorting to a lot of stab stitching and I hated every moment.
But I was determined to finish the bed quilt I'd started. (This was many, many years ago.) So I tossed aside the hoop and tried quilting without it. I discovered that it was far more relaxing and my quilting was superior in every way. That's how I've done it ever since. I've read of one quilter and met another who quilt in this same manner and swear by it. But that's it. Why does everyone else use hoops?
I thought I ought to mention how I quilt, because that might be why I can get away with sewing on borders the way I do, without measuring. I read in Gwen M's applique book about how she does her borders and she was saying how much stress her quilt top is under because she quilts in a frame. Made me realize that my tops are never under stress, because they are never stretched. When I baste (always with lots of safety pins these days - so much faster than thread basting) I just layer the backing, batting and top together and pin. No stretching.
I suppose the one drawback to quilting like this is that markings tend to get rubbed off, at least when I do them. So I never mark my quilting designs in advance, always just do a bitty bit as needed. Or, as in this case, I quilt without marking anything at all.
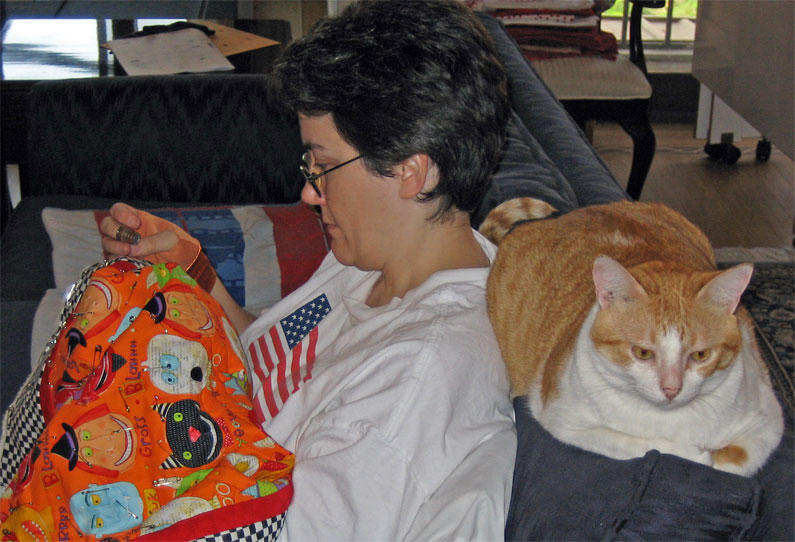
I coerced my husband into taking some photos of me quilting. He hates having people in his photos. Pictures should be of landscapes, monuments, architecture, whatever, with no people in sight whatsoever. Looking at our photos from the Nile cruise it practically looks like he went all by himself.
I'm wearing the Hand-Eze gloves which work fabulously for me. No more problems with numb wrists and fingers (I know, Bonnie, I know. Numb is bad.).
This is one of Habibi's favorite spots. There's a huge dip in the sofa cushion, he's spent so much time there.
 I'm afraid my massage therapist is going to yell at me for posture or something.
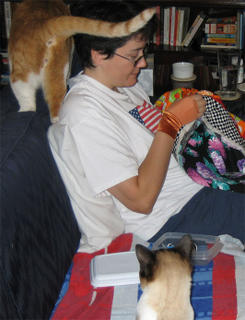 Gotta take a break to give lovings to the kitty. Pokey often jumps up into my lap with a mrah-mrow for attention.
But I was determined to finish the bed quilt I'd started. (This was many, many years ago.) So I tossed aside the hoop and tried quilting without it. I discovered that it was far more relaxing and my quilting was superior in every way. That's how I've done it ever since. I've read of one quilter and met another who quilt in this same manner and swear by it. But that's it. Why does everyone else use hoops?
I thought I ought to mention how I quilt, because that might be why I can get away with sewing on borders the way I do, without measuring. I read in Gwen M's applique book about how she does her borders and she was saying how much stress her quilt top is under because she quilts in a frame. Made me realize that my tops are never under stress, because they are never stretched. When I baste (always with lots of safety pins these days - so much faster than thread basting) I just layer the backing, batting and top together and pin. No stretching.
I suppose the one drawback to quilting like this is that markings tend to get rubbed off, at least when I do them. So I never mark my quilting designs in advance, always just do a bitty bit as needed. Or, as in this case, I quilt without marking anything at all.
I coerced my husband into taking some photos of me quilting. He hates having people in his photos. Pictures should be of landscapes, monuments, architecture, whatever, with no people in sight whatsoever. Looking at our photos from the Nile cruise it practically looks like he went all by himself.
I'm wearing the Hand-Eze gloves which work fabulously for me. No more problems with numb wrists and fingers (I know, Bonnie, I know. Numb is bad.).
This is one of Habibi's favorite spots. There's a huge dip in the sofa cushion, he's spent so much time there.
 I'm afraid my massage therapist is going to yell at me for posture or something. Gotta take a break to give lovings to the kitty. Pokey often jumps up into my lap with a mrah-mrow for attention.
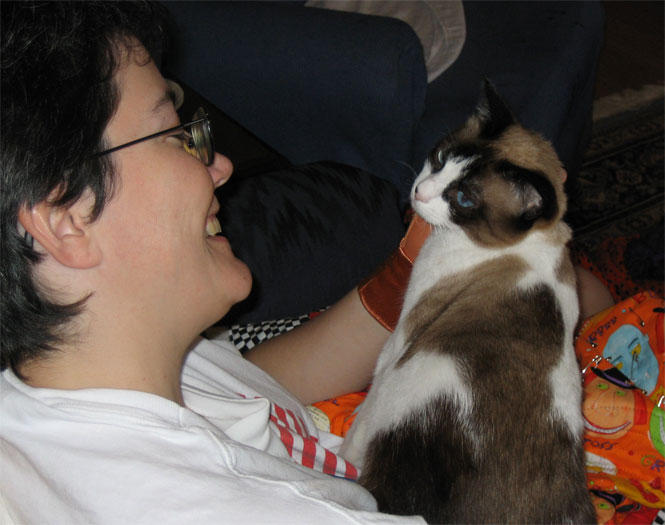
Apocalypse Now???
I don't usually do the personality tests that are out there on the web, but the Classic Movie Personality Test? Right up my alley.
Not sure that I agree with this result. Harrumph. At least it wasn't something bland and milktoasty tho, or some romance movie - that would have been worse.

Not sure that I agree with this result. Harrumph. At least it wasn't something bland and milktoasty tho, or some romance movie - that would have been worse.
Abe Lincoln??
And once I got started I couldn't stop. Here's another personality quiz result. Pretty funny actually.

Friday, August 19, 2005
new maverick, evil spam, geek girlness
I discovered we have a new Quilt Maverick amongst us. Check out "A Day in the Life of a Quilt Junkie" if you haven't already - Tracey has some very beautiful, moving things to say about life and dealing with pain. Makes me feel guilty now for whining about my teeny headache (which I still have by the way - just a little whine with my cheese today).
While reading Tracey the Junkie's blog I came across what is to me a relatively new phenomena: the evil comment spam. I can't tell you how much I hate telemarketers and spammers- why oh why does anyone ever every buy from them? Anyway, I looked up Blogger knowledge and there is a way to filter the evil spam out and I have now adjusted my blog to do so. I'm sorry, but this means you are going to get one of those screens asking you to type in some letters/numbers to make sure you're not a machine any time you leave me a comment. I know, I don't like that either, but I refuse to have an unlisted number, so to speak.
I finished the novel "Ghosts in the Snow" by Tamara Siler Jones last night. I discovered her when I was googling on "quilt" and "blog" (of which there are still not nearly enough out there). She's a quilter as well as a writer. Not just any kind of writer either; she combines my two favorite genres: mystery and fantasy. The book jacket describes it as combining "forensics, fantasy, and edge-of-your-seat suspense like never before." Don't know that I was all the way at the edge of my seat, but otherwise, an accurate statement.
The book is gruesome in parts, somewhat over-the-top gruesome, but there you go. I highly recommend it tho, so if it sounds like something you might enjoy, try it.
Does it actually sound like it would appeal to you?
For years I've been the oddball quilter. (Before that I was just an oddball :) ) My quilts always look different than everyone else's. Always. I'm almost always the only quilter in the group who likes cheesy sci fi movies and reads fantasy. I've always been the only quilter (at least that admits to it) that watches zombie movies with glee. "Return of the Living Dead" has always been one of my favorites and the recent "Dawn of the Dead" remake and "Shaun of the Dead" were fabulous. So for me to stumble across Ms. Jones, a quilter, who admits to loving horror movies (and proves that handily in her writing) is rewarding, inspiring, affirmative... something along those lines. I don't feel quite so alone out here. Aren't blogs grand?
http://www.tamarasilerjones.com/blog/
Thursday, August 18, 2005
my new body
I finally went in to the doctor yesterday. He thinks it's possible that this constant headache might be caused by the Ibuprofin I have been taking, unsuccessfully, to make the swelling in my knee go down. So now I'm on this new wonder drug called Aspirin. So far, not very thrilled. Still have the headache and the knee isn't any better (tho that will take time). Hasn't even been 24 hrs yet and don't know how long it is supposed to take for the Ibuprofin to be out of my system. Sigh.
As soon as I can kick this headache I will call the physical therapist and start working on the exercises that will reduce (is it too much to hope for "get rid of entirely") my knee problem.
Did anyone else watch "Now and Again?" It was a great sf show by Glenn Gordon Caron, the man who brought us "Moonlighting." The concept is that overweight, out-of-shape, middle-aged John Goodman's brain is transplanted into the young, fit, biogenetically engineered Eric Close. Fabulous show, tragically placed on the Friday night death-slot and named far too similarly to "Once and Again" the soapy relationship show on another channel. The show lasted one season and I'm still waiting for it to show up on DVD.
Besides saving the world from evil, much of the drama comes from John/Eric wanting his own life back. He wants to be with his wife and daughter in suburbia, eating cheeseburgers and fries, and kicking back on the recliner reading.
Anyway, I want that body. I want to wake up one morning fabulously fit, muscular, high pain threshold. Don't need to be able to climb buildings like Spiderman or do any of that superhero stuff, I just want to be able to sew where and when I want to. For hours and hours and hours at a time without making my neck hurt so bad and my arms go numb. Numb is bad. Shooting pain, also bad. I want to be able to walk on the treadmill and get some exercise, without throwing my knee out. I'm tired of it all.
Now I realize I haven't done the best job of keeping this body in shape. Haven't done a job of it at all if we're going to be brutally honest. But the one that is already fit, sure I'll keep it up. Really.
Finished Sampler Quilt Top
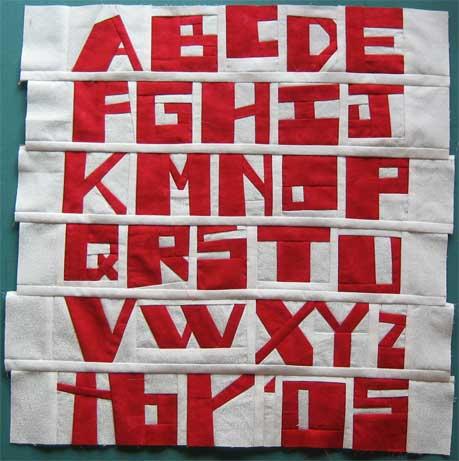
I got so carried away with my sewing that I forgot to take pictures. Sorry. Since you saw the sampler last, I sewed a 7/8" b-strip to the right side of almost all the letters, then cut and trimmed. Some letters didn't need this, such as the A, V, X (that row was going to be too long and I decided this was the place to scrimp) , t and all the letters down the right side.
[NOTE: If I'd had letters with a slant on the left side that I'd wanted to keep slanty, I'd have joined the background inbetween bit to that left side of that letter, rather than to the right side of the previous letter.]
At this point all the letters had to have their sides straightened. They were already the same height, but didn't need to be the same width. But to make them join up properly, they had to have straight sides. There was an exception to this rule on the bottom row. I liked the slant on the little t and wanted to keep it and the little b had a wide bit of letter fabric that I could cut into. So I placed the t overlapping the b, and sliced, following the edge of the t, so that I had matching angles.
I joined all the letters in a row together. A couple of times I did a bad job with my quarter inch seam allowance and ended up with rows that had a V-shape. Easy enough to remedy - I just resewed to get a straight seam. Now I'm not saying the row has to have a perfect straight edge - it doesn't. But Vs aren't good either.
After the letters were joined, I sewed a 2" background to the first and last letter of each row. The next step was to sew a 7/8" strip between each of the rows, but not the top and bottom cuz I was going to sew wider strips there. I sewed with all the seams on top so that I could make sure they were sewn down the way I wanted them to lay. Whenever I hit seams that run sort of parallel to the edge (I get those a lot), they have a tendency to pull away from the presser foot. So I have to go a bit slow and get them back where they belong.
You'll notice that the rows tend to bend down in a bit of an arc. Don't worry about it - that will go away or at least decrease as soon as there is a seam on the other side of the row. Also, at least when I do this, I get a bit of a wavy edge where my seam allowance hasn't been consistent, where there have been bunches of fabric in the seam. This also isn't a big deal, at least if you're using skinny in between row strips like I am - it all comes out in the wash.
In this first photo, the top two rows are joined together, the next three have their inbetween strip sewn on, and the bottom row is all by itself.
Next is a photo of all the rows joined together. By the way, you'll notice that I didn't decide on a set length for these rows and precut them. Instead I folded each row over, matching the beginning and end of the letters, and marked the "middle" that way with a pin. I joined "middle" to "middle" and didn't worry about the actual length of the row.
 The next step was to even up the sides of this piece. I wasn't measuring, just trying to get it straight, and all lined up with the shortest row on each side.
I did end up having to whack a bit off the bottom row, where the '05 was sticking way down. I wouldn't have minded if there was a straight, angled line across the bottom, but that was a bubble. I then sewed 2" strips of b-fabric to the top and bottom.
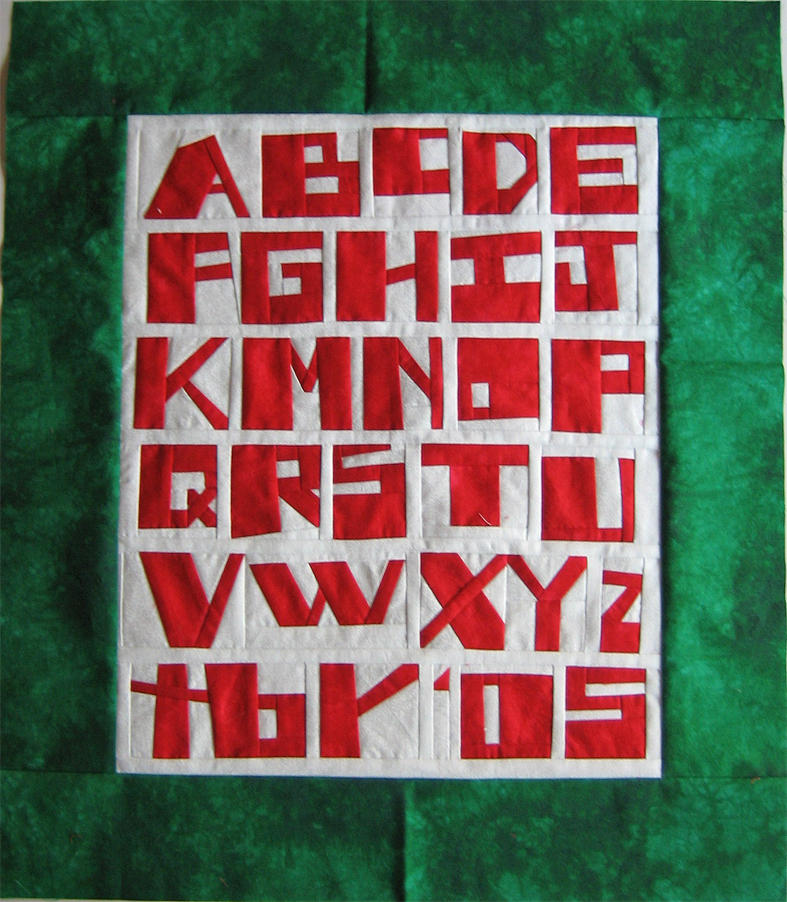
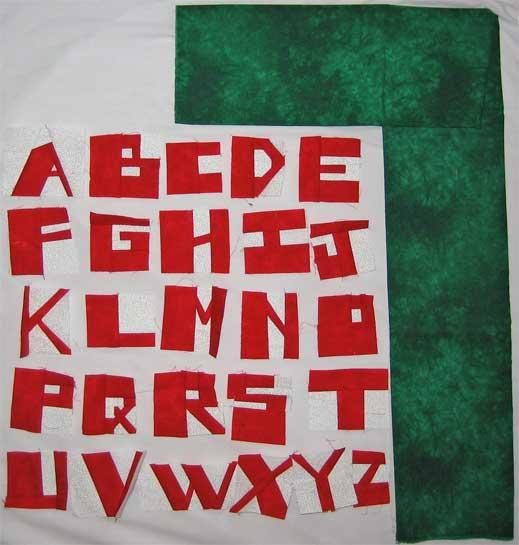
So that's that, the middle bit is done, now all that is left is the border. I consider adding a tiny red accent border, followed by the wider green border. No. I decide on a 3" finished green border, since 3" is more or less the size of the letters along with a bit of the background. I cut out the border strips and lay them down surrounding the letters.
Ugh. I was hoping for a cute small quilt and that is just not what I am getting. So after all that sewing on of extra background fabric, I decide I don't like it and whack down all the sides so that I'll end up with roughly 1/4" worth of background after I sew on the border. That did the trick. I hated all that extra white, but removing it makes the quilt look cute again. The top is 20" by 23".
So here it is, the finished sampler quilt top. If you double click on the photo, you'll get a really good large picture of it.
This quilt has a very specific Christmasy name. Look at the top carefully and then tell me what it is. You'll get extra credit points.
Tuesday, August 16, 2005
Halloween Eyes
Finn over at Pieces from my Scrapbag is working on a Frankenstein for Halloween and asked for suggestions on eyes. This is one way I love to make them. First I applique on eye shapes - I've used a blanket stitch here - and then attached buttons. On this first set, I started with big pink buttons and added little yellow ones on top of them, stitched on with orange embroidery floss.
 For this next pair of eyes, I added stem stitch around the appliques for emphasis. This isn't a double layer of buttons but a couple of really cool ones I got in one of those bags of craft buttons you can get at Michael's, Hancocks, those kinds of places. It was really just pure luck, but aren't they great? Something similar might be available on cards.
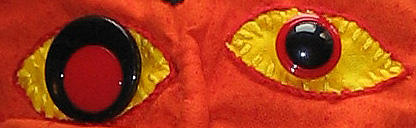
And, no, you don't get to see the whole pieces - it's not Halloween yet.
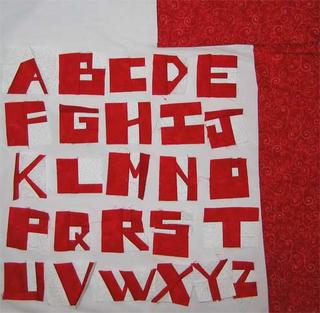
Sampler Layout
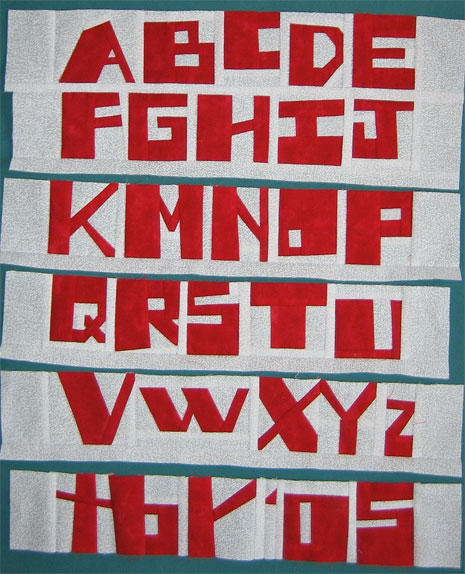
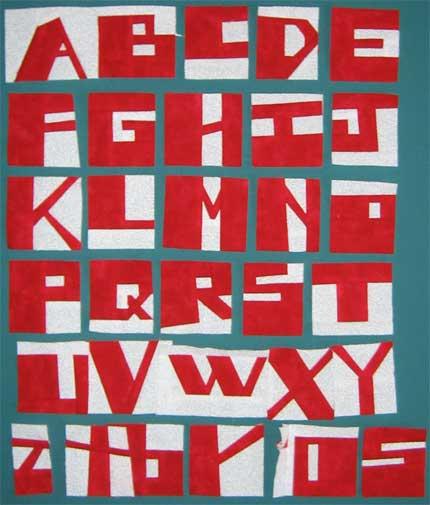
What do you think of the letters all together? Boy, my Y and Z certainly trailed off didn't they. Very wee. K looks sickly as well. I could always make them over again, but I refuse to give in to that perfectionist impulse.
I decided to keep the sampler quilt small. I could make it grow by adding the small letters, the numbers, a saying, my whole name, some pieced house blocks. It's very easy to keep going, but I'm not going to. Instead I'll demonstrate how to put it together.
The first step is to decide on a layout. In this first couple of pics I was checking on a border. Do I want to keep this quilt strictly red and white or add a different color in? Tried this with blue too, but the photo didn't work out. I've made enough 4th of July quilts lately anyway.
 After playing with borders and layout, I made all the letters 2 7/8" high. Some got cut down and others had background fabric added to their top, bottom or both and then got cut down. You do not have to work this precisely. You could get them all vaguely to the height you want and after you join them together lop off any extra.
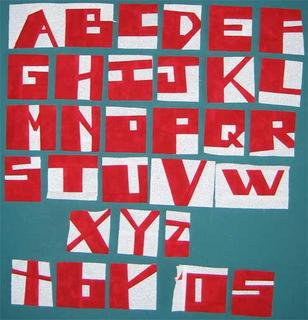
The letters are obviously going to have a hard time fitting on that bottom row if I include six of them, esp when the W is so wide, so how about if I slip the Z down onto the bottom row? Oh, and I decided to make my initials and the last two digits of the year as well. Now it's really crowded on the bottom row again, but I could prune down the b, r, and zero.
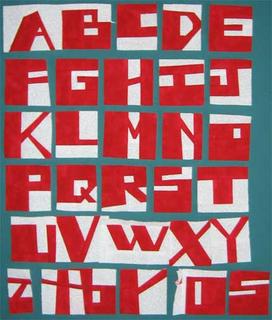 Here's another option, to have X Y Z on the bottom row. I could also jam those over to the left and start making numbers until I hit the end of the line. You'll notice in this example I've now got six letters per row instead of the five above.
I decided to keep the sampler quilt small. I could make it grow by adding the small letters, the numbers, a saying, my whole name, some pieced house blocks. It's very easy to keep going, but I'm not going to. Instead I'll demonstrate how to put it together.
The first step is to decide on a layout. In this first couple of pics I was checking on a border. Do I want to keep this quilt strictly red and white or add a different color in? Tried this with blue too, but the photo didn't work out. I've made enough 4th of July quilts lately anyway.

 After playing with borders and layout, I made all the letters 2 7/8" high. Some got cut down and others had background fabric added to their top, bottom or both and then got cut down. You do not have to work this precisely. You could get them all vaguely to the height you want and after you join them together lop off any extra.
The letters are obviously going to have a hard time fitting on that bottom row if I include six of them, esp when the W is so wide, so how about if I slip the Z down onto the bottom row? Oh, and I decided to make my initials and the last two digits of the year as well. Now it's really crowded on the bottom row again, but I could prune down the b, r, and zero.
 Here's another option, to have X Y Z on the bottom row. I could also jam those over to the left and start making numbers until I hit the end of the line. You'll notice in this example I've now got six letters per row instead of the five above.
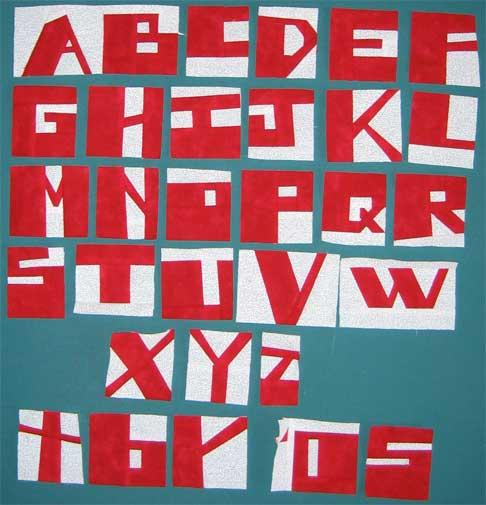
Monday, August 15, 2005
this and that
I've had a headache for two days now - real tight pressure at my temples. Now in the old days that would have just meant I had a headache, but last spring I was completely laid out by what my doctor thinks was a migraine. A headache that left me barely able to move for almost 6 weeks and left me really rocky for another month after that. So I have this fear that another one is going to strike. This probably isn't it, but still the worry. Figure I ought to mention it so that when I don't post in ages you'll know it's not cuz I've gotten bored.
I got my copy of Gwen Marston's new applique book. While I'm still not fond of the gigantic four block lay out, I loved her examples, student work and antiques. It's a liberated approach to applique, where she explains how to do it freehand, but okay here's the templates if you must. A quote from the book:
I got my copy of Gwen Marston's new applique book. While I'm still not fond of the gigantic four block lay out, I loved her examples, student work and antiques. It's a liberated approach to applique, where she explains how to do it freehand, but okay here's the templates if you must. A quote from the book:
As you can see, it seems that for nineteenth-century quiltmakers, variation in design was considered as legitimate an approach as design demanding exactness. The free-form approach to technique, including folded-fabric shapes and free placement of shapes, also contributed to the spontaneity of these earlier quilts.
This difference in attitude toward quiltmaking is key to the look of these wonderful old quilts. It is hard for me to believe that a seamstress with such obvious and impeccable sewing skills couldn't have turned a corner if she had deemed it important. It's all in the attitude!
Hugs and Kisses
 This is my quilt Hugs and Kisses, made just with Xs and Os. I actually hadn't intended it to look like this - I'd also made the words "I love you" and was planning on saying something else as well. I think. But when I put some of the Xs and Os together I was amazed at how graphic and pow they looked, so changed the direction I was going.
I made loads of them of varying sizes before starting to sew them together - and all of them didn't make it into the quilt. For this quilt I didn't add any extra background fabric to make any letter fit, I just whacked off anything that stuck out. I quilted fans around the border in black perle cotton and outlined each of the letters in varying colors of perle or floss. I shouldn't say outlined the letters. I quilted a bit in from the edge - through all the layers. I could do that using a huge needle - wouldn't want to try it with a baby quilting between needle.
Capitals D and K
Here we come to a couple of letters that I've made harder than I needed to. Both the capital D and K can be made by making a large V with a wide mouth and then adding a strip of background where you need it to complete the letter.
That's not how I made my D. I also could have made an O and maybe added small background triangles on the right side. Did I? Noooo, too easy. Instead, I cut out a rectangle of background and lopped off the upper and lower right corners. Then I added five strips of l-fabric going around the front of it. This is what it looked like with the first two additions.
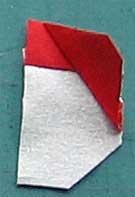 The first four strips were narrow, the fifth one on the bottom was a medium. Looking back at it, I probably should have started the mediums sooner. Not the prettiest letter ever is it.
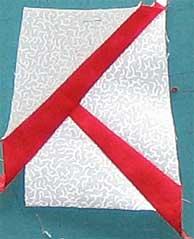
 And here's the K. I started with a background fabric rectangle and sliced it where the legs go.
 Then I inserted angled strips. If I'd used straight ones this wouldn't look quite so wonky. Wish I'd used wider strips, more angled, but oh well. Take a look at this upside down and you'll notice a small y peeking out, tho if I were making the y, I'd have angled my very first slice thru the background differently.

Capital Q
Alright, this is it, we've hit the end of the capital letters. I think. Did I miss anything? I know I've made them all, getting them posted might be another story.
Q can be dead easy. Make an O and then add the little tail to the side. And there are probably easier ways than I've done it, but sometimes I just want to have a bit of fun. Stupid Q starts with an x. I made mine too small the first time (there are lots of seam allowances coming out of this) and had to start over. I then added an oversized bit of background attached to the same-size strip of letter fabric. Oversized gives me more room to adjust the strip to exactly where I want to attach it. And I did want it in a specific spot. I can't describe it well, but you can see how the strip was attached.
Q can be dead easy. Make an O and then add the little tail to the side. And there are probably easier ways than I've done it, but sometimes I just want to have a bit of fun. Stupid Q starts with an x. I made mine too small the first time (there are lots of seam allowances coming out of this) and had to start over. I then added an oversized bit of background attached to the same-size strip of letter fabric. Oversized gives me more room to adjust the strip to exactly where I want to attach it. And I did want it in a specific spot. I can't describe it well, but you can see how the strip was attached.
 And repeated the procedure.
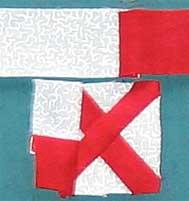 And finished off with a two more additions of the letter fabric on the top and left side. And there's the stupid Q.
Sunday, August 14, 2005
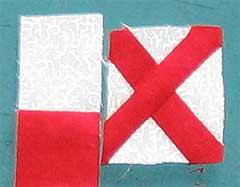
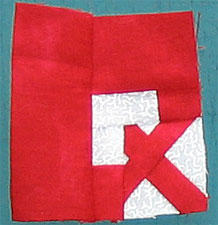
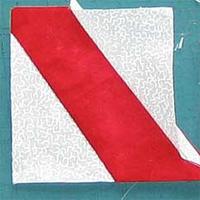
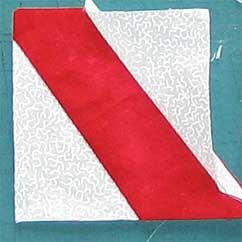
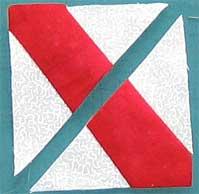
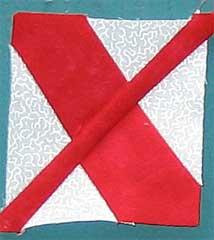
Capital X
Okay, X is actually really easy so there is no good reason for saving it until so close to the end. Except that it's a nice segue into the stupid Q. X is inserts and trims - you've done it before.


Capital Y
Y not. Start by making a small V. I don't do the lower portion until after the upper one is finished so that I can gauge how wide to make the l-fabric bit. I'm off sometimes and that's ok too.
 Sew 'em together and there you go.

 Sew 'em together and there you go.
Capital R
The capital R starts out the same way the P does, only this time a strip needs to be inserted in the background fabric first. At this stage I was trying to decide whether or not to add some background to the right of the upper bit to make it wider. I decided against it.
 I left the longer lower bit alone - may cut that at a slant later.

 I left the longer lower bit alone - may cut that at a slant later.
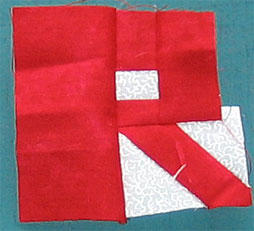
power outages
I haven't been posting as much as I would like to lately (I feel the compulsion to do so nearly every day). We've been hit by one power outage after another for the last week or so. They don't last long and I'm lucky to live in a building with a generator, but every time it happens, bam the computer is off. Yes, we've tried an OOPS (UPS) but it can't get charged up enough on the transformer to work. (Our big computer is 110, local power is 220.)
Last night we had three outages, which I was lucky enough to sleep through but which woke up my husband every time (the a/c shuts down, the fan is off - ack). While I've been awake we've had two. Sigh. We temporarily at least appear to be doing fine, but my baby Pokey is having fits for attention. She's nipping me, which is not nice. I've explained that to her unsuccessfully. So gonna go play with the cat and get some lunch (not in that order - can't reward her for bad behavior) and maybe just maybe come back later today.
Last night we had three outages, which I was lucky enough to sleep through but which woke up my husband every time (the a/c shuts down, the fan is off - ack). While I've been awake we've had two. Sigh. We temporarily at least appear to be doing fine, but my baby Pokey is having fits for attention. She's nipping me, which is not nice. I've explained that to her unsuccessfully. So gonna go play with the cat and get some lunch (not in that order - can't reward her for bad behavior) and maybe just maybe come back later today.
Quilt Mavericks and art quilting
Have ya'all checked out the Quilt Mavericks Web Ring lately? When Bonnie and I started the ring on July 17th there were just the two of us (and three sites - she has two cuz she does double the work that I do) and now we're up to 10 sites. Woohoo.
There have been growing pains. Bonnie and I know who we are and the kinds of quilts that we like and want to see more of, but expressing that in words is much harder. While it's been great that we've been getting interest from art quilters, that's not who this ring is for. If you're an art quilter who also does some traditional with a twist, then great, welcome. But if your sole focus is art quilts, there is a better home out there for you.
We're hoping to find (and have - woohoo again) quilters who still have a foot in traditional, but want to run with scissors, color outside the lines, lose the points on their triangles and mismatch seams. Quilters who are still traditional, but without using patterns, who make the quilts more expressive of themselves, or at least want to and are looking for encouragement. Quilters who love the feel of fabric and who would hand quilt every quilt if it were physically or numerically possible. Now how I've expressed this may not express Bonnie's views accurately, and she after all is the keeper of the key to joining the webring, so check out the homepage if you're intested.
It's obviously very difficult to say what is and is not art quilting. I've had a couple of different quilters express the opinion that the quilts I'm making with the letters fit just fine into the art quilter category. I don't see them that way at all. Here is a pic of one of my favorite antique quilts:
There have been growing pains. Bonnie and I know who we are and the kinds of quilts that we like and want to see more of, but expressing that in words is much harder. While it's been great that we've been getting interest from art quilters, that's not who this ring is for. If you're an art quilter who also does some traditional with a twist, then great, welcome. But if your sole focus is art quilts, there is a better home out there for you.
We're hoping to find (and have - woohoo again) quilters who still have a foot in traditional, but want to run with scissors, color outside the lines, lose the points on their triangles and mismatch seams. Quilters who are still traditional, but without using patterns, who make the quilts more expressive of themselves, or at least want to and are looking for encouragement. Quilters who love the feel of fabric and who would hand quilt every quilt if it were physically or numerically possible. Now how I've expressed this may not express Bonnie's views accurately, and she after all is the keeper of the key to joining the webring, so check out the homepage if you're intested.
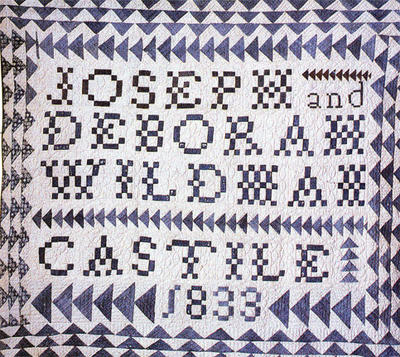
It's obviously very difficult to say what is and is not art quilting. I've had a couple of different quilters express the opinion that the quilts I'm making with the letters fit just fine into the art quilter category. I don't see them that way at all. Here is a pic of one of my favorite antique quilts:
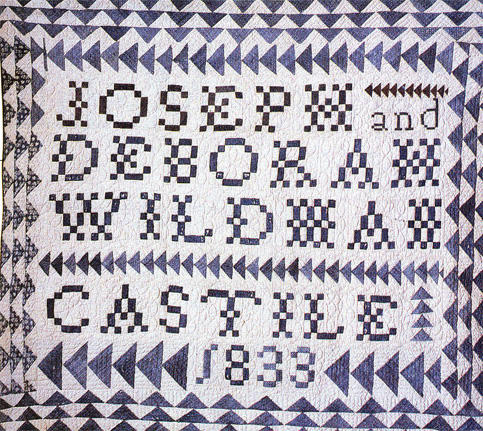
The quilt is believed to have been made by Deborah Wildman, married to Joseph, of Castile N.Y. in 1833 (go figure). The quilt is 74" x 68 1/2" and you gotta bet it was for one of those narrow tiny beds they used to sleep in.
I can see the progression from this quilt to the bed quilt I just made. Mine just happens to be made in an Amish palette, has more information about why it was made, and is made with free-pieced letters instead of little, meticulous squares.
I'm interested in any opinions anyone might have on any of the topics I've brought up. Even if you don't have a Blogger account, I believe you can post a comment anonymously and then just sign it as yourself. Or be anonymous if you choose, so long as you're constructive.
Thursday, August 11, 2005
Don't Cry for Me
 Sorry if I left ya'all with a mistaken impression after a previous post about how hard it is to get quilting cotton here. It is hard, that part is true, but that doesn't cause any difficulties for me. I belong to the have-stash, will-travel crowd. I'm missing a stack of pinks from these shelves - they're off somewhere else as I ponder a project with them. Well, pondered - that was months ago and I never decided to start it. Just never got them back here again. They're living in exile with the batting and odd polyester and nasty fabrics I've collected for Halloween decorating.
While I do have some strips of like-sizes all separated out (they hang over a quilt rack not pictured here) for the most part I store my scraps by color. For the last several years I've made lots of projects that are very improvisational - I didn't need certain sizes of pieces or strips. And when I am stripping, I prefer playing with my fabric before I start the project. I like to put all the ones I'm thinking about using together, sort, add, remove and then starting cutting strips specifically for that project. The pre-cut strips rarely get used. I know that's bizarre, don't ask me to explain why that is. Certainly a completely different approach from friend Bonnie.
Queen of the Quilts
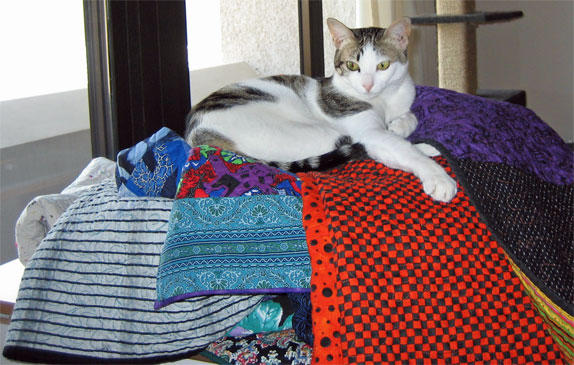 Yesterday I had my quilts out and just tossed them onto a table after I'd finished with each of them. Lily is not one to miss out on an opportunity to sit on something new. New fabric pile on the dining room table? Gotta be on that. This tendency only applies for something that needs to stay clean. Dirty clothes on the floor, ho hum.
You can get an idea of what I use for fabric backings - whatever I have and don't like well enough to put on the front of a quilt. Now, that doesn't apply to the Halloween lap quilt (all that you can see on the right side of the pile) - I see and use both sides of that, so it didn't hurt me to use fun fabric on the back of that one. Still pieced different chunks together tho. I can see the orange and black checkerboard, orange with black spots, the stripey fabric with pumpkins and vines, the black with stars and some purple with a black paisley design that I actually like, but fades like crazy so has been banned from frontage.
Wednesday, August 10, 2005
this week's Rockstar performances
Really enjoyed Rockstar: INXS tonight. Marty's acoustic performance blew me away. He's gone from a zero to a 90 in my book. Also thought Ty was awesome - I just think he uses his voice so much better than all the others. He's singing, not shouting.
The band certainly liked Susie's performance much better than I did. J.D. and MiG were certainly fine, but not excellent.
I want to like Jordis more than I do. Her voice needs some age to it, some maturity and gravel. Whereas Deanna is all gravel - she needs to go.
Brandon once again did a great Southern rock song proving he does that really well, but what about INXS. I would be jumping up and down to get rid of him, except that I thought he did respectably with "Devil Inside" last week. If they would just hold him down and give him a haircut, shave off the Elvis sideburns and dress him better. Was thrilled when he threw the hat into the crowd (don't have to see that monstrosity again, hurrah) but there it was on his head again at the end. Aiyee.
You can certainly tell the band is down on Jessica. Last week they told her they didn't see any personality in her "Blister in the Sun" performance and this week no passion. Her saying she was giving it all she had was not very promising. I expect she'll be the next to go.
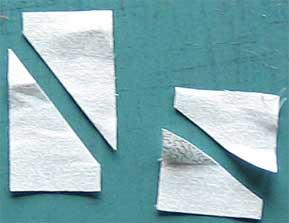
Capitals N and Z
Capitals N and Z are made the same way, although I use a long skinnier rectangle to start out the N than I do for the Z. Just like with the M, you want to start the slice at least 1/4" down from the top and bottom of the letter.
 Insert your strips, add the sides to the N and the top bottom to the Z and you're done. Now in the case of my N, I did add more background to the bottom of the middle (just like with the M) but that's just how I wanted it to look.

 Insert your strips, add the sides to the N and the top bottom to the Z and you're done. Now in the case of my N, I did add more background to the bottom of the middle (just like with the M) but that's just how I wanted it to look.
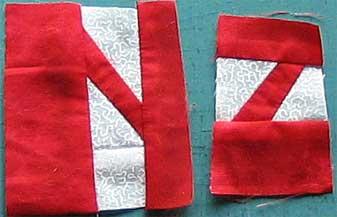
Tuesday, August 09, 2005
Expat Quilter
My husband and I moved to Egypt in October 2003. We actually live in the suburb of Ma'adi, altho Cairo is so huge and sprawling it feels like one big city. When we arrived we had zero cats. But being here with all the pathetic, needy strays made my biological cat clock go off and we eventually ended up with four of them, but that's a story for a different day.
I belong to Quilters in De Nile along with other Americans, Canadians, Brits, an Aussie, and our lovely part-time resident Dane. It's actually amazing how many expats live in Cairo, esp here in Ma'adi, working for oil, construction, and AID companies. I think some of the women are geographical quilters (far from home, may as well be doing something to get out of the house) while others like myself would be quilting no matter where we live. We get together once a week, at least usually. So many families bail out during the summer that the two of us who were left took a couple of weeks off.
Good 100% quilting fabric is non-existent in Cairo. Thin, solid cottons are available but that is about it, at least that I have discovered. Now an adventurous quilter could go to the fabric souk and start working with all sorts of polyesters, nylons, and interesting fabrics. I wish I could be so bold myself. I look at the quilts the women of Gee's Bend make out of corduroy, denim, and whatever they have and marvel. I admire them, but that's just not something I'm interested in doing. As Bonnie would say, my train just doesn't stop at that station.
So it's hard to start quilting here, much better to have a stash that comes with. Haven't found high-quality thread either. Now we can get DMC embroidery floss, all kinds of buttons and the most beautiful, inexpensive silk floss that you can imagine. I brought home loads of turquoise and cobalt scarabs and carved camel bone camels for my embellishing friends in the states. So there are always trade offs, just like everything else in life.
For an excellent look at what everyday life is like here in Cairo, check out quilter Jenny Bowker's blog called Postcards from Cairo - the link is in my sidebar. Now her situation in the country is completely different than mine - her husband is the big cheese at their embassy and she does all sorts of diplomatic functions. So ignore that. But stories about walking on the streets because the sidewalks are all in disrepair and built too high, that I can relate to.
Capital M
The easy way to make an M is to simply make an E and lay it on its side. Take a look at my quilt Star Light to see how that looks, it's back in July's archive (I think).
If you want angles, start by making a small V or a large narrow one. I started with a small V cut so that the legs of the V end on the sides rather than in the corner or the top of the section. (That has to do with where you want this bit to meet the side of the letter - I have made some M's where the middle bit has ended up detached from the sides and I don't like it so well.)
After finishing up the V portion, I added some background at the bottom
 and a wide strip on the left and a medium strip on the right. I present, the M.
Capital W
W can be made like an E or like an M.
You can also decide to torture yourself and make it more complicated. I took approx 3" of my wide background and cut where I imagined my left-slanting legs of my W would be. A note at this point: the W will only end up as tall as your section is wide.
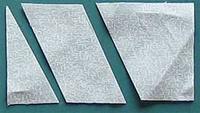 I sewed medium l-fabric to the left sides of my background as follows. I evened up the edges. Next I cut a slant into the middle bit of background, approx 1/4" over and did my strip insert maneuver with a narrow l-fabric. And added narrow l-fabric on the right side as well.
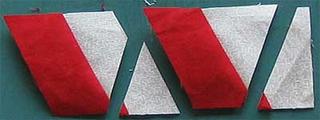 I cut out new bits of background to add to the sides of the W. Looking at the finished product, I probably should have cut down that middle area more. If I were obsessive about it, could take that middle seam out, recut and resew, but what would be the point of that?

You can also decide to torture yourself and make it more complicated. I took approx 3" of my wide background and cut where I imagined my left-slanting legs of my W would be. A note at this point: the W will only end up as tall as your section is wide.
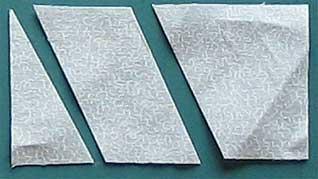 I sewed medium l-fabric to the left sides of my background as follows. I evened up the edges. Next I cut a slant into the middle bit of background, approx 1/4" over and did my strip insert maneuver with a narrow l-fabric. And added narrow l-fabric on the right side as well.
 I cut out new bits of background to add to the sides of the W. Looking at the finished product, I probably should have cut down that middle area more. If I were obsessive about it, could take that middle seam out, recut and resew, but what would be the point of that?
Subscribe to:
Posts (Atom)